Tag: new drivers

  • Sunday Sign Day: Falling Rocks (What It Means and How to Drive It Calmly)

    Sunday Sign Day: Falling Rocks (What It Means and How to Drive It Calmly)

    Share this:

    The Falling Rocks sign is a warning sign you’ll usually see on roads that run alongside steep hillsides, cliffs, or mountain cuts. It’s there because rocks can end up in the roadway—sometimes after rain, melting snow, freeze-thaw cycles, or wind.

    This sign isn’t meant to scare you. It’s meant to help you adjust early so you have more time to respond if something is in your lane.

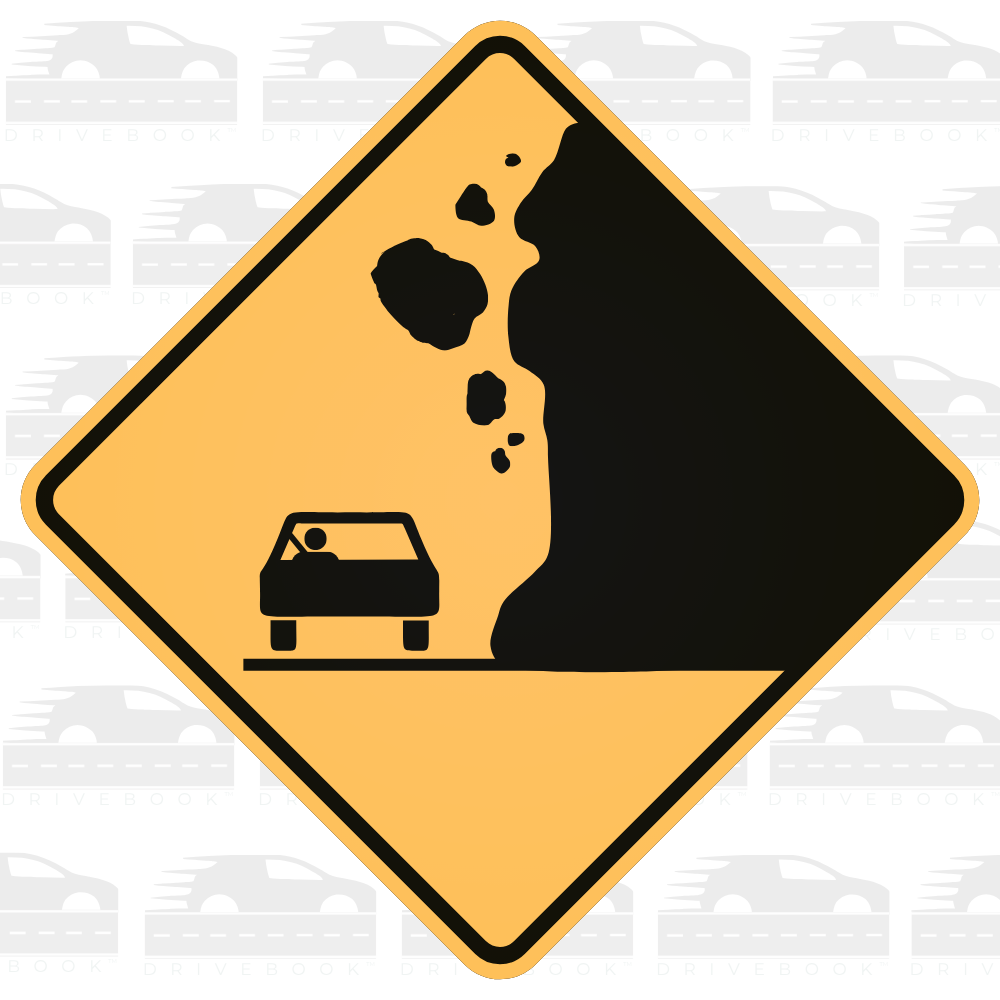
    What the Falling Rocks sign means

    The sign means: rocks may fall onto the road ahead (or may already be on the road). It’s a heads-up that the area has a known history of rockfall or debris.

    In the MUTCD (the official U.S. standard for traffic signs), this is a warning sign used where rockfall is possible: FHWA MUTCD (Warning Signs).

    Why this hazard is common in spring

    Rockfall can happen any time, but it’s often more likely when conditions loosen the ground, including:

    • Melting snow that saturates soil and cracks
    • Heavy rain that increases runoff and erosion
    • Freeze-thaw cycles that expand cracks in rock and pavement edges
    • Wind that knocks loose already-fractured material

    In other words: spring weather can change the roadside faster than you’d expect—especially on roads carved into hillsides.

    For a general overview of how weather and slope conditions can affect roadway safety, FHWA safety resources are a credible place to learn more: FHWA Highway Safety.

    What to do when you see it (simple, practical steps)

    When you see a Falling Rocks sign, you don’t need to do anything sudden. Think smooth and prepared:

    1. Scan farther ahead than usual
      Look down the road surface, not just at the car in front of you. You’re checking for small rocks, gravel, or larger debris.
    2. Keep a steady speed (and be ready to slow gently)
      If visibility is limited (curves, shadows, rain), it’s reasonable to ease off the accelerator a bit so you have more time to respond.
    3. Increase following distance
      Extra space helps if the driver ahead brakes for debris.
    4. Stay centered in your lane
      Avoid drifting toward the shoulder where rocks often collect first.
    5. Avoid stopping in the hazard zone if you can
      If traffic allows, it’s usually better to keep moving through the area rather than stopping near a slope. (If you must stop due to traffic, that’s okay—just stay alert and keep your focus ahead.)

    If you see rocks in the road

    If debris is in your lane:

    • Brake smoothly and early (no last-second slamming if you can avoid it)
    • Check mirrors before changing lanes
    • Steer around only if it’s clearly safe
    • If the debris is large or blocking the lane, consider pulling over safely after you’re past the hazard area and reporting it (many states use 911 for immediate roadway hazards; some have a non-emergency highway number)

    A calm rule of thumb for new drivers: don’t trade one risk for another. A sudden swerve into another lane can be more dangerous than slowing down and stopping safely.

    Common misconceptions teens have about this sign

    • “It’s just for mountain roads.”
      You can see Falling Rocks signs anywhere there’s a steep cut, cliff, or unstable slope—sometimes even on smaller highways.
    • “If I don’t see rocks, I can ignore it.”
      The sign is about possibility, not a guarantee. It’s a reminder to scan and stay ready.
    • “I should hug the center line to avoid the shoulder.”
      Better: stay centered in your lane. Crossing toward the center line creates new risks with oncoming traffic.

    Closing: the goal is calm awareness, not worry

    The Falling Rocks sign is a simple message: this stretch of road can change quickly. With a little extra scanning and space, you can drive it smoothly and confidently.

    If you want a calm, visual way to learn road signs and rules (and the “why” behind them), you can explore Drivebook at https://mydrivebook.com.

    Sources:
    FHWA MUTCD – Part 2C (Warning Signs and Object Markers) (covers warning sign standards; relevant section for the Falling Rocks warning sign)
    https://mutcd.fhwa.dot.gov/htm/2009/part2/part2c.htm

    FHWA – Highway Safety (general roadway safety guidance and context)
    https://highways.dot.gov/safety

    Share this:
  • Night Driving Basics for New Drivers (Without the Stress)

    Night Driving Basics for New Drivers (Without the Stress)

    Share this:

    Night driving can feel like a whole new skill set—darker roads, brighter headlights, and fewer visual cues. The good news is that a few simple habits can make night driving feel calmer and more predictable. This post is for early driving knowledge and permit test prep (not behind-the-wheel instruction), so you’ll understand what to look for and why it matters.

    These basics are helpful for permit test prep and understanding common night driving rules without memorizing them blindly.

    1) Use your headlights early—and use the right setting

    Headlights aren’t just for helping you see—they help other drivers see you. A good rule of thumb: if the sky is dim, it’s raining, or you’re having trouble seeing details clearly, turn your headlights on.

    • Low beams are the default for most night driving.
    • High beams can help on dark roads with no oncoming traffic, but they should be dimmed for oncoming cars and when you’re following someone closely.

    On many permit tests, you’ll see questions about when to use headlights and when to avoid high beams. The “why” is simple: high beams can reduce safety if they glare into someone else’s eyes.

    2) Look farther ahead than you think you need to

    At night, your “seeing distance” shrinks. That means you have less time to notice a curve, a stopped car, a pedestrian, or an animal near the roadway.

    Try to build the habit of scanning farther down the road instead of focusing only on what’s directly in front of your car. When you look ahead, you naturally give yourself more time to make smooth, calm decisions.

    3) Don’t stare at oncoming headlights—use your lane position as a guide

    Bright headlights can feel distracting, especially when you’re new. If you stare at them, your eyes may take longer to readjust to the darker road.

    Instead, keep your attention on:

    • The right edge line (or the road’s edge) as a reference
    • The center line and your lane position
    • The general shape of the road ahead

    This is a common permit-test concept: avoid glare by shifting your focus to a safer visual reference, not by “fighting” the brightness.

    4) Give yourself a little more following distance

    Even if your speed stays the same, night conditions can make it harder to judge distance and spot hazards early. Adding extra space between you and the car ahead gives you more time to react smoothly.

    Think of it as “building in calm.” More space means fewer sudden decisions—especially if the car ahead brakes unexpectedly or you encounter something you didn’t see right away.

    5) Keep your windshield and mirrors clean (it matters more than you’d expect)

    A slightly dirty windshield can turn headlights into a blurry glare. The same goes for side mirrors and the rearview mirror.

    Quick, practical habits:

    • Wipe the inside of the windshield too (it can film over)
    • Clean mirrors so lights don’t streak
    • Make sure your wipers aren’t smearing

    This isn’t about perfection—it’s about reducing visual “noise” so your brain can focus on the road.

    6) Watch for pedestrians and cyclists in places you might not expect

    At night, people can be harder to see—especially if they’re wearing dark clothing. Pay extra attention near:

    • Crosswalks and intersections
    • Bus stops
    • Parking lot entrances
    • Neighborhood streets

    For permit prep, it helps to remember that you’re responsible for scanning even when the road looks empty. Night driving often feels quiet, but that doesn’t mean there’s nothing happening.

    Closing thought

    Night driving doesn’t have to feel intimidating. When you use your lights correctly, scan farther ahead, and give yourself a little extra space, you’re creating a safer, calmer driving environment—one choice at a time. If you’re studying for a permit test, these habits also connect directly to the “why” behind many common rules.

    These are the kinds of patterns you’ll see repeated in permit questions—understanding them now makes the test feel a lot more predictable.

    Share this:
  • What New Drivers Should Know About Roundabouts

    What New Drivers Should Know About Roundabouts

    Share this:
    Aerial view of a U.S. roundabout showing cars entering and yielding

    Roundabouts are showing up on more roads across the US, and they tend to catch drivers off guard — new and experienced alike. Even some seasoned drivers who never had a clear explanation of how roundabouts work can find themselves hesitating at the entry point. Once you understand how they work and why, they are actually one of the more straightforward intersections you will encounter.


    What a Roundabout Actually Is

    A roundabout is a circular intersection where traffic flows in one direction — counterclockwise — around a central island. Instead of stopping at a red light, drivers slow down, yield to traffic already in the circle, and then merge in when there is a safe gap.

    That is the core idea: yield before entering, then keep moving once you are inside.


    Why Roundabouts Exist

    Roundabouts are not just a design trend. According to the Federal Highway Administration (FHWA), roundabouts are a proven safety countermeasure that can substantially reduce crashes resulting in serious injury or death. The reason is simple: there are no high-speed, head-on or right-angle collisions. Traffic moves slowly and in the same direction.

    Understanding why a rule or road feature exists helps you use it correctly. Roundabouts are built for safety and flow — not to confuse you.


    The One Rule That Matters Most: Yield Before You Enter

    When you approach a roundabout, you will see a yield sign. That sign means: traffic already inside the roundabout has the right of way. You wait for a safe gap, then you enter.

    You do not stop inside the roundabout. You do not stop once you have entered and traffic is moving. You only pause at the entry point, and only if needed.

    This is the most common source of confusion — new drivers sometimes stop inside the circle or try to force their way in. Neither is correct.


    How to Choose Your Lane (Multi-Lane Roundabouts)

    Single-lane roundabouts are straightforward. Multi-lane roundabouts require a bit more planning.

    A general guide:

    • Taking the first exit (turning right): Use the right lane.
    • Going straight through: Either lane is typically acceptable, but check posted lane signs.
    • Taking a later exit (turning left or going around): Use the left lane.

    The key is to decide your lane before you enter. Changing lanes inside a roundabout is not safe and is not permitted. Look for lane-use signs as you approach — they will show you which lane leads to which exit.


    Signaling in a Roundabout

    Signaling is simple once you know the pattern:

    • Entering: You generally do not need to signal when entering.
    • Exiting: Signal right as you approach your exit. This lets other drivers and pedestrians know you are about to leave the roundabout.

    Some drivers skip this step, but using your signal when exiting is a good habit and is expected on a permit test.


    Pedestrians and Cyclists at Roundabouts

    Roundabouts have crosswalks, and pedestrians have the right of way at those crosswalks — just as they do at any intersection. Before you enter the roundabout and again as you exit, check for people crossing.

    Cyclists may ride through the roundabout in the travel lane, or they may use a separate path alongside the road. Either way, give them space and do not rush around them.


    Common Mistakes to Watch Out For

    Knowing what tends to go wrong is just as useful as knowing what to do right. These are the errors that come up most often at roundabouts — and being aware of them puts you a step ahead.

    • Stopping inside the roundabout. Once you have entered and traffic is flowing, keep moving. Stopping unexpectedly inside the circle confuses other drivers and disrupts the flow the roundabout is designed to maintain.
    • Entering without yielding. Some drivers pull in without checking for traffic already circling. The yield sign at the entry is not optional — vehicles inside always have the right of way.
    • Forgetting to signal when exiting. It is easy to focus on navigating the circle and skip the exit signal entirely. That signal matters — it tells the driver behind you and any pedestrians at the crosswalk what you are about to do.
    • Choosing the wrong lane too late. In a multi-lane roundabout, trying to sort out your lane after you have already entered creates a real problem. Lane changes inside the roundabout are not permitted. Make the decision before you arrive.
    • Going too fast on approach. Roundabouts require you to slow down and read the situation — traffic inside, pedestrians at crosswalks, lane signs. Entering at speed leaves you no time to do any of that well.
    • Overlooking pedestrians at the exit. Drivers often check for pedestrians when entering but forget to check again when exiting. Crosswalks exist at both points, and pedestrians have the right of way at both.

    Most of these mistakes come down to the same thing: moving faster than your awareness can keep up with. Slowing down on approach gives you the time to get everything right.


    A Quick Summary Before You Encounter One

    Here is what to keep in mind the next time you see a roundabout ahead:

    1. Slow down as you approach.
    1. Yield to traffic already inside the circle.
    1. Choose your lane before entering.
    1. Keep moving once you are in — do not stop.
    1. Signal right when you are ready to exit.
    1. Watch for pedestrians at crosswalks — entering and exiting.

    Roundabouts feel unfamiliar at first, but they follow a clear and consistent logic. Once you have driven through a few, the pattern becomes second nature.


    Roundabouts are a good example of a road feature that seems tricky until you understand the reasoning behind it. The rules are not arbitrary — they are designed to keep everyone moving safely. That same principle applies to most of the rules you will study for your permit test: when you understand the why, the what becomes much easier to remember.


    New to roundabouts? This guide explains how they work, who has the right of way, common mistakes to avoid, and what to expect — in plain, clear language for new drivers.


    Sources


    Share this:
  • Why Road Signs Feel Hard to Remember — and How Drivers Actually Learn Them

    Share this:

    Road signs are often one of the first things new drivers try to memorize, and one of the first things that feels overwhelming. With dozens of shapes, colors, and symbols, it’s easy for signs to blur together—especially when learning happens all at once.

    Understanding how road signs are designed, rather than trying to memorize each one individually, makes them much easier to recognize and remember.


    Road Signs Are Designed to Be Recognized Quickly

    Road signs are not meant to be read slowly or analyzed in detail. They are designed for quick recognition while a vehicle is moving.

    This is why signs rely on:

    • Color to signal the type of message
    • Shape to indicate the category of rule
    • Symbols instead of long text

    When drivers understand these design patterns, signs become easier to identify—even before reading the words.


    Color Carries Meaning

    Colors on road signs are not decorative. Each color is used intentionally to communicate a specific type of information.

    For example:

    • Red signals stopping or prohibition
    • Yellow warns of potential hazards
    • Green provides guidance and direction
    • Blue offers driver services or information

    Learning what colors represent helps drivers interpret signs more confidently and quickly.


    Shape Matters More Than Many People Realize

    Sign shapes help drivers recognize meaning even when visibility is limited.

    Common examples include:

    • Octagons for stop signs
    • Triangles for yield signs
    • Rectangles for regulatory or informational signs
    • Diamonds for warnings

    Recognizing shapes allows drivers to anticipate what a sign means before fully processing the details.


    Why Memorization Alone Can Be Frustrating

    Trying to memorize a long list of signs without understanding their structure often leads to confusion. Signs may look similar, especially when learned out of context.

    Drivers learn signs more effectively when they focus on:

    • patterns instead of lists
    • meaning instead of labels
    • recognition instead of recall

    This approach supports both permit preparation and real-world driving.


    State Differences Can Add Complexity

    While many road signs are standardized across the U.S., some states use variations or additional signs. Construction zones, school areas, and local regulations may introduce signs that are less familiar.

    Reviewing a state’s official driver manual helps learners understand which signs are most relevant for their area.


    Building Confidence Through Recognition

    Road signs become less intimidating when drivers understand how they are designed to communicate. With clarity and repetition, recognition becomes automatic rather than stressful.

    A calm, pattern-based approach helps new drivers respond confidently to signs on both the test and the road.

    Share this:
  • Why Right-of-Way Rules Confuse New Drivers

    Share this:

    Right-of-way rules are one of the most confusing parts of learning to drive. Many new drivers understand individual rules in isolation, but struggle when those rules interact in real driving situations.

    Understanding why right-of-way rules exist — and how they are meant to guide decision-making — helps reduce confusion and build confidence behind the wheel.


    Right-of-Way Is About Predictability, Not Priority

    A common misconception is that right-of-way gives one driver “permission” to go first. In reality, right-of-way rules exist to create predictable movement so drivers can anticipate what others will do.

    These rules help:

    • reduce hesitation at intersections
    • prevent conflicting movements
    • support smoother traffic flow

    Right-of-way is less about who wins and more about who should proceed to keep everyone safe.


    Intersections Add Complexity

    Many right-of-way situations occur at intersections, where multiple vehicles, pedestrians, and cyclists may be present at the same time. Factors such as stop signs, traffic signals, turn directions, and arrival order all influence who should move next.

    New drivers often feel overwhelmed when trying to evaluate multiple elements at once. This is normal — intersection judgment improves with understanding and experience.


    Why Memorization Alone Doesn’t Work

    Memorizing isolated rules (such as “yield to the driver on the right”) without understanding context can lead to hesitation or incorrect decisions.

    Effective learning focuses on:

    • recognizing common patterns
    • understanding why certain vehicles yield
    • anticipating how other drivers are likely to move

    When rules are understood in context, they are easier to apply in real situations.


    Pedestrians and Cyclists Matter Too

    Right-of-way rules don’t only apply to vehicles. Pedestrians and cyclists are often given priority in specific situations, such as crosswalks or shared roadways.

    Understanding these interactions is essential for safe driving and is commonly included in permit testing.


    State Rules Can Vary

    While many right-of-way principles are consistent nationwide, specific rules and scenarios can vary by state. Differences may include:

    • how four-way stops are handled
    • pedestrian right-of-way details
    • rules involving turning vehicles

    Families should always review their state’s official driver manual to confirm local requirements.


    Building Confidence Through Understanding

    Right-of-way rules become clearer when learners focus on understanding movement patterns instead of trying to remember isolated instructions. With time and clarity, these rules begin to feel intuitive rather than confusing.

    A confidence-first approach helps new drivers make safer, more predictable decisions on the road.

    Share this:
  • Why Permit Test Preparation Feels Overwhelming — and What Actually Helps

    Share this:

    Preparing for a learner’s permit test often feels overwhelming for teens and families. Driver manuals are dense, practice tests focus on memorization, and it’s not always clear how individual rules connect to real driving situations.

    Understanding why this process feels difficult is the first step toward approaching permit preparation more calmly and confidently.

    Information Overload Is Common

    Most permit tests cover a wide range of topics, including road signs, traffic laws, right-of-way rules, and safe driving practices. When all of this information is presented at once, it can feel like too much to absorb.

    Learning is more manageable when information is introduced gradually and explained in context. Breaking concepts into smaller sections helps learners focus on understanding rather than trying to remember isolated facts.

    Understanding Matters More Than Memorization

    Permit exams are designed to assess whether a new driver understands the rules of the road and how they apply in everyday situations. Memorizing answers without understanding why rules exist often leads to confusion later—especially once driving begins.

    When learners understand:

    • what a rule means

    • why it exists

    • how it applies in real driving situations

    they are better prepared to make safe decisions beyond the test itself.

    Confidence Builds Through Clarity

    Feeling prepared is closely tied to feeling confident. Confidence grows when learners are given clear explanations, visual examples, and time to process new information without pressure.

    A calm learning environment helps reduce anxiety and supports steady progress. Permit preparation does not need to feel rushed to be effective.

    State Rules Can Add Complexity

    While many driving rules are universal, permit test content can vary by state and may change over time. Differences in age requirements, restrictions, and specific rules can add another layer of confusion for new drivers.

    Families should always review their state’s official driver manual and requirements to confirm local details, especially when preparing for a permit test.

    A More Supportive Way to Approach Permit Preparation

    Permit preparation is most effective when learning is structured, supportive, and focused on understanding rather than performance. When teens feel supported and informed, they are better equipped to navigate both the test and real-world driving situations.

    A confidence-first approach helps turn permit preparation into a positive first step toward safe, responsible driving.

    Share this: